
We are delighted to welcome Ryan and Nicole of Wonderful Idea co, USA, on board to help with our exhibition development. They started working with us last autumn, Nicole designed and fabricated a playful interactive sign to welcome visitors to the show and Ryan traveled to Explora, Albuquerque to lead professional development workshops with the […]
Blog
Exhibition Round Up
We have a number of touring exhibitions open now or coming very soon. There are going to be lots of chances to see our automata collection this year. Keep an eye on the Now & Future Exhibitions page for all the details. We are really looking forward to our upcoming show on Hastings Pier where […]
The Mesmerise Machine – Limited Edition 2017
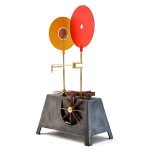
Introducing the 4th and latest chapter in Martin Smith’s love machine series. The Mesmerise Machine is a hand-holding, dancing, kinetic sculpture that gently hypnotizes the object of your affection. Materials: Steel, Aluminium, Brass and Bronze. Dimensions: H 31cm L 17cm W 9cm Limited Edition of 25 + 1 Artists Proof Colours: Red, yellow, brass and […]
Cirkus Mechanikus at VIDA!
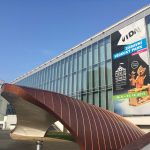
The Mechanical Circus exhibition created in collaboration with Rijksmuseum Boerhaave is travelling to the Vida science centre in Brno. This is the first time our automata has visited the Czech Republic. We are just doing the finishing touches and it will be ready to welcome visitors from tomorrow. The show features 31 pieces of automata from […]
About Ron Fuller

Since Ron’s sad departure in July a number of new articles have been published. We’ve updated our page about Ron with the new links.
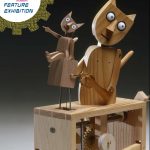
Summer Automata Exhibitions
There are currently six touring exhibitions featuring automata from Cabaret Mechanical Theatre on display around the world. The Mechanicals show is at The Royal Engineers Museum in the UK and Frost Science in Miami. Moving Toys with Sharmanka Kinetic Theatre is in South Korea. The Clockwork Garden is at The Bowes Museum until November. There […]
Ron Fuller 1936-2017

We are very sad to announce the death of Ron Fuller, at the age of 80. Ron was an integral part of the formation of Cabaret Mechanical Theatre having first met Sue Jackson while they were both students at Falmouth Art School in 1957. Ron’s distinctive toys, for example, Hens Laying Eggs and Tapping Can-Can […]
Mechanicals in Whitehaven
If you happen to be sailing around the coast of the UK in the next six weeks, you might want to book a mooring at Whitehaven harbour. Our touring exhibition, The Mechanicals, has arrived at The Beacon Museum and will be entertaining visitors of all ages from Saturday 25th March. West Strand Whitehaven Cumbria CA28 7LY Phone: 01946 592302 […]
A Curious Turn Tour Dates
The eagerly anticipated tour of the Crafts Council’s exhibition, A Curious Turn, begins at Wolverhampton Art Gallery. Exhibition Dates: 18th Feb 2017 to 21st May 2017. Links: Crafts Council and Wolverhampton Art Gallery. The show will then tour the UK: 8th Jul – 2nd Sep 2017, Gallery Oldham 15 Sep – 19 Nov 2017, Derby Museum and Art […]
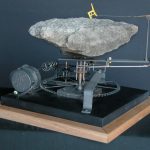
The Agreeing Heart by Paul Spooner

It’s not often that P. Spooner, the well-known European automaton maker, has a new idea for a Valentine’s Day offering. This year is no exception; he made one of these for a secret lover many years ago and almost forgot he’d done it. Rugged carving and the painterly application of expensive pigments are complimented by […]